Posts Tagged ‘cloves’

Molasses Cookies

February 3, 2013

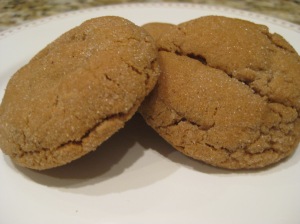
IMG_9560I don’t know about you, but I have two types of stores that I could literally live in (while handing over my full paycheck in exchange for goods!). Kitchen stores (ie: Sur La Table) and spice stores (ie: Penzey’s). And the funny thing about spice stores is that I don’t even really need to be on the lookout for a spice to spend a good half hour in this olfactory heaven. I just glance at the spices available, and the recipes that they generally display to get your creative juices flowing.

So last time I was at Penzey’s, I spotted a recipe for Molasses Cookies. At first glance I thought to myself, not sure I have ever made those and it has probably been since childhood last time I tasted them. But, I started thinking that a spiced cookie would be delicious in the winter – might even warm me up!

This recipe is originally from Linda Aukerman and to my surprise, has no butter. Apparently, when baking with just shortening (vs butter) it really affects the texture of the cookie. And I have to admit, the crunchy outside and super chewy inside is worth the ingredient switch. And, combined with the warming spice mixture, make this cookie amazing.

These cookies were a clear winner the minute we tasted them – or quite possibly the moment they came out of the oven and we could smell them. They also disappeared at work quite quickly.

Thanks to Penzey’s and Linda Aukerman for sharing a recipe that does warm me up on a cold winter night!

MOLASSES COOKIES
1 1/2 cups shortening, melted and cooled (do NOT substitute butter)
2 cups sugar
1/2 cup molasses
2 eggs
4 cups flour
4 tsp baking soda
1 tsp ground cloves
1 tsp powdered ginger
2 tsp cinnamon
1 tsp salt
1/3 cup extra sugar or vanilla sugar for rolling (if you have a Penzey’s or spice shop nearby and can get the vanilla sugar, I highly recommend it!)

To the melted, cooled shortening add: the sugar, molasses and eggs. Beat well with hand mixer. In a separate bowl, sift together the dry ingredients. Add the dry ingredients to the wet ingredients, mixing to incorporate. Chill for at least an hour (can make the dough ahead and make the cookies the next day if desired). Preheat oven to 375. Using about a tablespoon of dough, form into balls. Roll in sugar and place on ungreased cookie sheets (although I would recommend a silicone mat or parchment paper), about 2 inches apart. Bake at 375 for 8-10 minutes. Check at 8 minutes. You want them to flatten but still be soft. Let the cookies cool for at least 2 minutes before removing them from the pan, as they can break if you try to pick them up when they are very hot. Cool on a cooling rack.

Pumpkin Bread

October 27, 2011

For those who read my blog, know it has been a long time since I have posted. A few months in fact. And the unfortunate reality is that it isn’t because of my lack of time to blog. It is my lack of time to cook. Apologies to all who blog, but the latter is much more concerning.

Cooking and baking is part of what makes me calm, helps me keep things in perspective, allows me to feel control when other things feel out of control. And, most importantly, it allows me to share my food with others, and therefore share my love through the gift of food.

But, my busy job and travel schedule has resulted in nights of take out, frozen pizza and late night visits to our favorite local restaurants.

So, this past weekend I was finally in town. No work trips. No packed social calendar. Just a weekend to enjoy fall and reset for the busy week ahead. And fall being my favorite culinary season, I knew I had to take this opportunity to get back to what I love.

So, after 8 mini loaves of pumpkin bread that filled our house with the scents of fall, and was shared with neighbors, coworkers and friends, I rekindled what had been missing in my hectic life.

Although I love my job, and feel blessed every day that I go into work, I remembered the many other things that make me who I am. I had been missing going for a run, reading the latest Bon Appetit and spending the time with my husband that we both deserve.

So on Sunday, with the aroma of cozy and spicy fall filling our house, after delivering a loaf to our neighbor and packing up the others for coworkers, after making my butternut squash risotto with a glass of red wine listening to Italian music…..I knew that my life needed to shift. I needed to go back to what makes me happy, and prioritize it, no matter how hectic my life becomes.

So, this pumpkin bread symbolizes my commitment to spend more time doing what I enjoy doing – and that is spreading love through food.

And, it was only fitting that the pumpkin bread recipe I found was that of Bobby Flay, who I surprisingly met the weekend before at Keeneland. A sign? Maybe.

So besides the emotional connection I now have to Bobby Flay’s pumpkin bread, it is quite possibly the best recipe I have ever made. Granted, there is more sugar than in a batch of chocolate chip cookies, but his mixture of spices (especially All Spice, my favorite cold weather spice) make this a  comforting taste of fall.

So, for those who need to rekindle their love of cooking, or those just looking to make a great fall treat for the ones they love, I thank Bobby Flay for giving me the recipe that made me realize what I had been missing.

PUMPKIN BREAD
1 9-inch loaf or a 4 small loaf pan

* 4 tablespoons unsalted butter, softened, plus more for the pan
* 1 3/4 cups all-purpose flour
* 1/2 teaspoon fine salt
* 1 teaspoon baking soda
* 1/2 teaspoon baking powder
* 1 teaspoon ground cinnamon
* 1/2 teaspoon freshly grated nutmeg
* 1/4 teaspoon ground allspice
* 1/4 teaspoon ground cloves
* 1 1/2 cups sugar
* 1/4 cup vegetable oil
* Scant 1 cup canned pumpkin puree, not flavored pie filling
* 2 large eggs

1. Preheat the oven to 350°F. Butter a 9-inch loaf pan.

2. Whisk together the flour, salt, baking soda, baking powder, cinnamon, nutmeg, allspice, and cloves in a small bowl.

3. Beat the butter, sugar, and oil on high speed in the bowl of a stand mixer fitted with the paddle attachment, scraping down the sides and bottom of the bowl a few times, until light and fluffy, about 1 minute.

4. Add the pumpkin puree and mix until combined. Add the eggs, one at a time, and mix until just incorporated. Mixing on low speed, slowly add the flour mixture and 2/3 cup water and mix until just combined. Spread the batter into the prepared pan and bake until a toothpick inserted into the center comes out clean, 1 hour to 1 hour 15 minutes (if you are using a small 4 loaf pan bake for only 45 minutes). Let cool in the pan on a wire rack for 10 minutes. Remove from the pan and let cool completely.

Poblano Albóndigas with Ancho Chile Soup

March 12, 2011

Our soup season is slowly coming to an end, so I was hoping to crank out a few batches of this warming comfort food before spring and the grill take over. This recipe was in Bon Appetit and the moment I saw it, I knew I had to try it.

Soup itself can sometimes not be considered a meal (a la Seinfeld) but this hearty soup has meatballs, rice and fried tortilla strips. Sounds like a meal to me!

It is work, so I would do it when you have a little time (like the weekend) but it is well worth the effort. The smoky flavor of the poblanos and ancho chile powder with the tangy punch of the lime and cilantro make this dish layered in its flavors. And – hint – make extra of the fried tortilla strips because they are fantastic! (also, I sprinkled some salt on them after I took them out of the oil for extra flavor).

The wonderful thing about this dish is not only is it amazing the first time around, but it makes fantastic leftovers. Go ahead and make the full batch, and give yourself lunch for the next few days.

So, as warm, hearty soups start trickling out of your recipe mix as the weather gets warmer, try this one before you put your dutch oven to rest.

POBLANO ALBONDIGAS WITH ANCHO CHILE SOUP
4 servings

Meatballs:
2 large fresh poblano chiles (9 to 10 ounces total)
1 pound ground beef (15% fat)
1/2 cup coarsely grated zucchini
1/4 cup finely grated onion
1/4 cup panko (Japanese breadcrumbs)
1 large egg, beaten to blend
2 garlic cloves, pressed
1 tablespoon ground cumin
1 teaspoon dried oregano (preferably Mexican), crumbled
1/2 teaspoon coarse kosher salt

Soup:
1 tablespoon olive oil
1/2 small onion, coarsely grated
2 garlic cloves, minced
3 tablespoons pure ancho chile powder or pasilla chile powder* (do not use blended chile powder)
9 cups low-salt beef broth
1/2 teaspoon dried oregano (preferably Mexican)
1 cup coarsely grated zucchini
1/4 cup long-grain white rice
1/4 cup chopped fresh cilantro
1 tablespoon (or more) fresh lime juice

Toppings:
3 tablespoons (or more) vegetable oil
4 corn tortillas, cut into 1/4-inch-wide strips
Chopped fresh cilantro

Meatballs:
Line large rimmed baking sheet with plastic wrap. Char chiles over direct flame or in broiler until blackened on all sides. Enclose in paper bag and steam 10 minutes. Stem, seed, and peel chiles, then chop finely (should yield about 3/4 cup).

Place chiles in large bowl. Gently mix in beef and all remaining ingredients. Using moistened hands and scant tablespoonful for each, roll meat mixture into 1-inch meatballs. Arrange meatballs on sheet.

Soup:
Heat oil in large pot over medium heat. Add onion with any juices and garlic. Sauté until onion is tender, about 3 minutes. Add chile powder and cumin; stir 1 minute. Add broth and oregano; bring to rolling boil. Reduce heat to very low, just below bare simmer, and cook 10 minutes.

Stir zucchini and rice into broth. Increase heat to medium and drop in meatballs, 1 at a time. Return soup to simmer. Cover and cook gently until meatballs and rice are cooked through, stirring occasionally and adjusting heat to avoid boiling, about 20 minutes. Add 1/4 cup cilantro and 1 tablespoon lime juice. Season soup with salt and add more lime juice by teaspoonfuls, if desired.

Toppings:
Heat 3 tablespoons oil in heavy medium skillet over medium heat 1 minute. Add half of tortilla strips. Cook until crisp, gently separating strips with tongs, 2 to 3 minutes. Transfer strips to paper towels to drain. Repeat with remaining tortilla strips, adding more oil if needed.

Ladle soup and meatballs into bowls. Top with tortilla strips and cilantro.

Butter Chicken (Murgh Makhanwala)

January 22, 2011

One of the first dates I had with my husband, I surprised him with preparing Indian food (one of his favorites). At the time, I was in a tiny apartment and really hadn’t developed the love for cooking that I have know. Reflective of that yet to be discovered passion was my sadly barren spice rack. I had the basics – cinnamon, oregano, etc. – but no garam masala or anything that sounded remotely exotic.

I remember going to Whole Foods and buying little baggies of the “rare” ingredients, as I saw them back then. I spent all day cooking, figuring out how to put together a sauce reminiscent of our nights of Indian takeout.

At the time, I was quite proud of my newly learned skills. And Rob was too, since I had clearly hooked him into yet another date with me. But, he didn’t marry me for my Indian cooking skills, since I have rarely attempted the feat since.

But, when I saw this recipe for butter chicken (our favorite dish at the old Indian restaurant around the corner), I knew I had to give it a go – if nothing but for old time’s sake.

The total preparation takes a little over an hour (and overnight marinade), so it might be ambitious for a weeknight, but it was perfect for a Sunday night. The sauce tasted exactly like the butter chicken we knew – and the leftovers the next day were even better. The only alteration I would make is to maybe shred the chicken before putting in back in the sauce, so eating it isn’t so much work.

Cooking Indian this time around was a bit different, though. I had no need to buy special ingredients because I had them all in my well-stocked spice closet (with the exception of curry leaves which I didn’t seem to miss). I had more confidence in my cooking abilities than years before. And, I had the ambition to make more than one dish by making the accompanying raita (which I recommend to help cool the heat). But, one thing did remain the same – I enjoyed it with the man I will spend the rest of my life with.

Thanks, Saveur, for this great Indian recipe that will be made frequently in our home.

MURGH MAKHANWALA (BUTTER CHICKEN)
Serves 4

FOR THE CHICKEN:
1/2 cup Greek yogurt
2 tbsp. fresh lemon juice
1 tbsp. canola oil
2 tsp. garam masala
1 tsp. crushed red chile
flakes
4 cloves garlic, minced
1 3″ piece ginger, peeled and thinly
sliced crosswise
Kosher salt, to taste
1 3–4-lb. chicken, cut into 8 pieces,
skin removed

FOR THE RAITA:
1/2 English cucumber (about 6 oz.),
seeded and grated
1/2 medium tomato, seeded and finely
chopped
1 1/2 tsp. kosher salt
1 cup plain yogurt
1 1/2 tbsp. roughly chopped fresh
mint leaves
1 tsp. fresh lemon juice
1/2 tsp. ground coriander
1/4 tsp. ground cumin
1/2 medium carrot, finely grated

FOR THE SAUCE:
1 tsp. crushed red chile flakes
4 cloves garlic, minced
4 green cardamom pods, cracked
3 whole cloves, crushed
1 28-oz. can whole peeled tomatoes,
undrained
1 3″ piece ginger, washed and grated
(skin on)
1 bay leaf
1/3 cup heavy cream
4 tbsp. unsalted butter, cut into 1/2″
cubes
1 tsp. garam masala
4 fresh or frozen curry leaves
Kosher salt and freshly ground black
pepper, to taste

Marinate the chicken: Combine all marinade ingredients except for chicken in a food processor; purée. Transfer marinade to a large bowl and add chicken, tossing to coat. Cover with plastic wrap and refrigerate for at least 4 hours or overnight.

Heat oven to 500°. Transfer chicken to an aluminum foil—lined baking sheet and spoon any marinade from bowl over chicken. Bake chicken until light brown but not cooked through, about 20 minutes. Transfer to a rack; set aside. Meanwhile, make raita: Toss cucumbers, tomatoes, and salt in a colander and let sit for 10 minutes. Press cucumbers and tomatoes to drain well and then transfer to a medium bowl along with yogurt, mint, lemon juice, coriander, cumin, and carrots; toss to combine. Cover with plastic wrap and let sit at room temperature for 1 hour.

Make the sauce: In a 6-qt. pot over medium-high heat, combine chile flakes, garlic, cardamom, cloves, tomatoes, ginger, bay leaf, and 2/3 cup water. Bring to a simmer, reduce heat to medium-low, and cook, stirring often and crushing tomatoes with a spoon, for 25 minutes. Discard bay leaf and transfer sauce to a food processor; purée. Return sauce to pot and continue cooking over medium-low heat until thickened slightly, about 15 minutes. Add reserved chicken pieces and any marinade from pan, along with 1/3 cup water. Cook, stirring occasionally, until sauce thickens and chicken is cooked through, about 10 minutes. Stir in cream, butter, garam masala, and curry leaves. Reduce heat to low and cook until flavors meld, about 5 minutes; season with salt and pepper. Remove from heat and keep warm.

To serve, transfer chicken and sauce to a serving platter and serve with the raita and basmati rice.

Pumpkin Whoopie Pies with Maple-Marshmallow Cream

September 30, 2010

I am not Amish. My husband isn’t a farmer. But I still love Whoopie Pies. (I am going somewhere with this, I promise…)

Apparently Whoopie Pies got their name from Amish wives making them for their farmer husbands and putting them in their lunches. When they would open their lunches, they would say “whoopie!” And, for good reason. If you have ever had these small round cakes sandwiched between sugary, marshmallowy frosting, you will know what I mean.

Although baking them myself? I don’t know…might be easier to go to a bakery. This technique would be doomed in my amateur kitchen – how do you make the cakes so round? How do you get the right texture? How do you assemble without breaking?

But, when Bon Appetit featured a recipe that included pumpkin and maple, classic fall ingredients, I really had no choice but to give it a whirl. And worst case, my husband would shout “whoops” instead of “whoopie” and we would break out the tub of vanilla ice cream in the freezer instead.

I cannot fully express the reaction my husband gave when he ate one – it wasn’t “whoopie” (after all his mouth was terribly full) but eventually was along the lines of “I can’t stop eating these!” The cake is like a pumpkin bread but sweeter, and the frosting I could just eat with a spoon. The perfect fall dessert!

Now, the technique. My fears were a bit unwarranted, I must say. You truly just spoon the batter on the cookie sheet (I used my cookie scooper) and they turn into pretty round cakes (although I saw in my Sur La Table catalog they do make Whoopie Pie Pans). Bon Appetit nailed the timing – 20 minutes exactly (check with a toothpick). Then, assembly was a piece of cake (sorry, I couldn’t help it!). No breakage, just perfectly beautiful pumpkin whoopie pies.

Thanks, Bon Appetit (and Portland, Maine’s Two Fat Cats Bakery), for broadening my baking skills and giving me a huge reason to shout “Whoopie!”

PUMPKIN WHOOPIE PIES WITH MAPLE-MARSHMALLOW CREAM
Bon Appetit says it makes 23 pies but I found it only made 16 (maybe mine were a bit big)

FILLING
1 cup powdered sugar, sifted
1 cup (2 sticks) unsalted butter, room temperature
1 7-ounce jar marshmallow creme
2 teaspoons maple extract
CAKE
3 cups all purpose flour
2 teaspoons ground cinnamon
1 1/2 teaspoons baking powder
1 1/2 teaspoons baking soda
3/4 teaspoon salt
3/4 teaspoon ground nutmeg
3/4 teaspoon ground cloves
6 tablespoons (3/4 stick) unsalted butter, room temperature
3/4 cup (packed) golden brown sugar
•3/4 cup sugar
•1/2 cup vegetable oil
•3 large eggs
•1 15-ounce can pure pumpkin
•1/2 cup milk
•Nonstick vegetable oil spray

FILLING

  • Using electric mixer, beat sugar and butter in large bowl until fluffy, about 2 minutes. Add marshmallow creme and maple extract; beat until blended and smooth. DO AHEAD Can be made 2 hours ahead. Let stand at room temperature.

CAKE

  • Sift first 7 ingredients into large bowl. Using electric mixer, beat butter and both sugars in another large bowl until blended. Gradually beat in oil. Add eggs 1 at a time, beating to blend between additions. Beat in pumpkin. Add dry ingredients in 2 additions alternately with milk in 1 addition, beating to blend between additions and occasionally scraping down sides of bowl. Cover and chill batter 1 hour.
  • Arrange 1 rack in bottom third of oven and 1 rack in top third of oven; preheat to 350°F. Line 2 baking sheets with parchment; spray lightly with nonstick spray. Spoon batter onto baking sheet to form cakes (about 3 level tablespoons each; about 12 per baking sheet), spacing apart. Let stand 10 minutes.
  • Bake cakes until tester inserted into centers comes out clean, about 20 minutes, rotating sheets halfway through baking. Cool cakes completely on baking sheets on rack. Using metal spatula, remove cakes from parchment.
  • Line cooled baking sheets with clean parchment; spray with nonstick spray, and repeat baking with remaining batter.
  • Spoon about 2 tablespoons filling on flat side of 1 cake. Top with another cake, flat side down. Repeat with remaining cakes and filling. DO AHEAD Can be made 8 hours ahead. Store in single layer in airtight container at room temperature.